TD5 Service - Water Pump
The water pump can fail in several ways. Leaks may occur at the seal between the pump and its cover, or at the junction between the pump and the accessory drive casting. Additionally, the pump's internal bearing is prone to failure over time.
Due to the pump’s location, a failed bearing must allow water to escape—otherwise, it risks accumulating behind the power steering pump. This is managed via a small weep hole (or drilling) in the accessory casting, which safely channels the coolant out rather than allowing pressure to build up behind the steering pump.
The water pump is driven by a keyed wheel that engages the rear of the power steering pump, itself powered by the auxiliary belt.
Replacing the pump is a fiddly job with limited space to work in, so you’ll need some specific tools to make it easier—as detailed in this write-up. You can, of course, remove additional components to improve access, but the method described below is how I prefer to tackle it.
First, remove the engine cover.

Next, undo the clips that hold the MAF sensor to the intake tube...and unplug the MAF sensor loom...

Next you can either just remove the waste gate tube out from the intake hose, or remove the clip and pull the small tube of the white angled connector.

Once that's disconnected, undo the jubilee clip from the Turbo.

And move the whole intake tube out of your way.

Next we need to remove the metal intercooler intake tube, so disconnect it at the turbo end.

And then the intercooler end
Lastly, there's the small tube running to the wastegate actuator controller. You can disconnect this either at the intercooler pipe or from the underside of the modulator—whichever works best for you. Vehicles without ACE offer slightly more working space here, which does help.
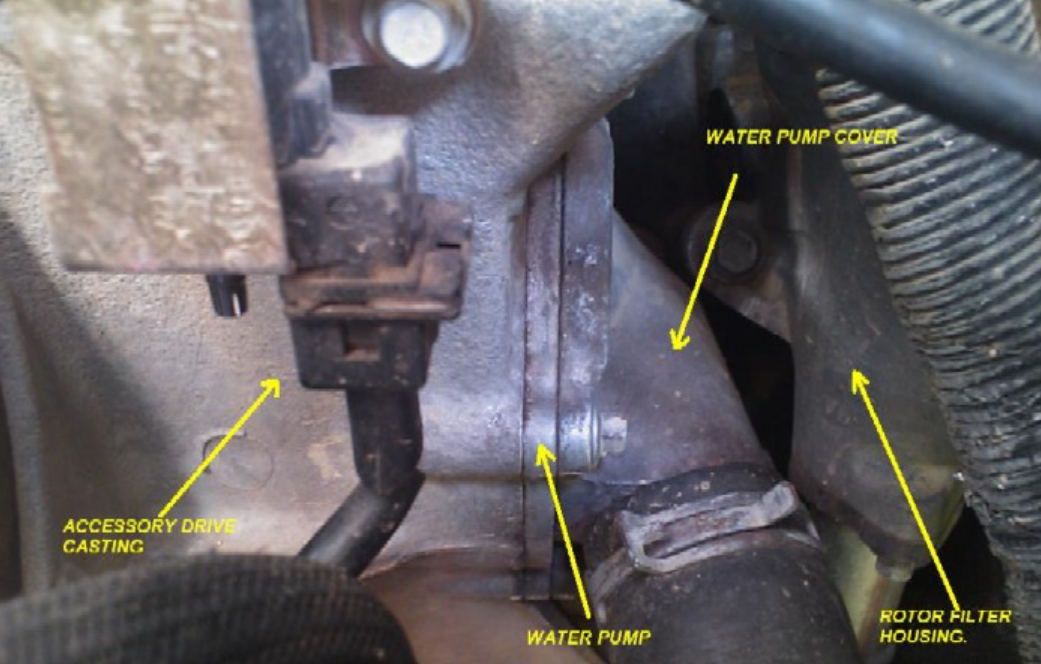
Next, we need to make additional room as the rotor filter housing is obstructing access. Although the workshop manual recommends removing it entirely, I find that unnecessary. As shown below, you can clearly see where the pump is located in relation to the rotor filter housing. You’ll have enough space to remove the water pump cover, but the pump itself won’t come out with this clearance alone.
To free up some additional space, the next step is to remove the rotor filter. If you’ve done a filter change before, this should be fairly straightforward. Simply undo and remove the two bolts securing the cover plate.

Then remove the filter and store in a clean container.

As shown in the image above, the rotor filter housing sits very close to the turbo oil feed pipe (top corner). To remove the pump, the housing needs to be shifted rearwards—but first, you'll need to undo and remove the turbo oil feed banjo fitting to allow the housing to slide back fully.
The rotor housing is secured with three bolts, including one located underneath.

There are two additional bolts at the rear, on the opposite side of the housing., you should be able to see them easily enough. They’re circled in the image below for reference.

However, to access those bolts, you'll also need to remove the standard engine oil filter.

Once the standard oil filter is out of the way, you can use a 3/8" ratchet, an extension, and a 10mm socket to remove the rotor housing bolts. These bolts can be quite tight, so make sure your tool is squarely aligned before attempting to loosen them. A six-point socket is recommended to avoid rounding off the bolt heads.

Take note of the bolt positions as you remove them—two (the lower rear and front) are identical in length, while the upper rear bolt is noticeably shorter. If access is tight, a magnet-on-a-stick can be a handy tool to fish them out.

t this point, you’ll notice the rotor housing flexing or shifting slightly on its drain tube. If needed, the entire assembly can be removed by disconnecting the drain tube—either at the base of the housing or from the engine oil sump. Just be mindful: removing it may cause oil to drain, so prepare accordingly.
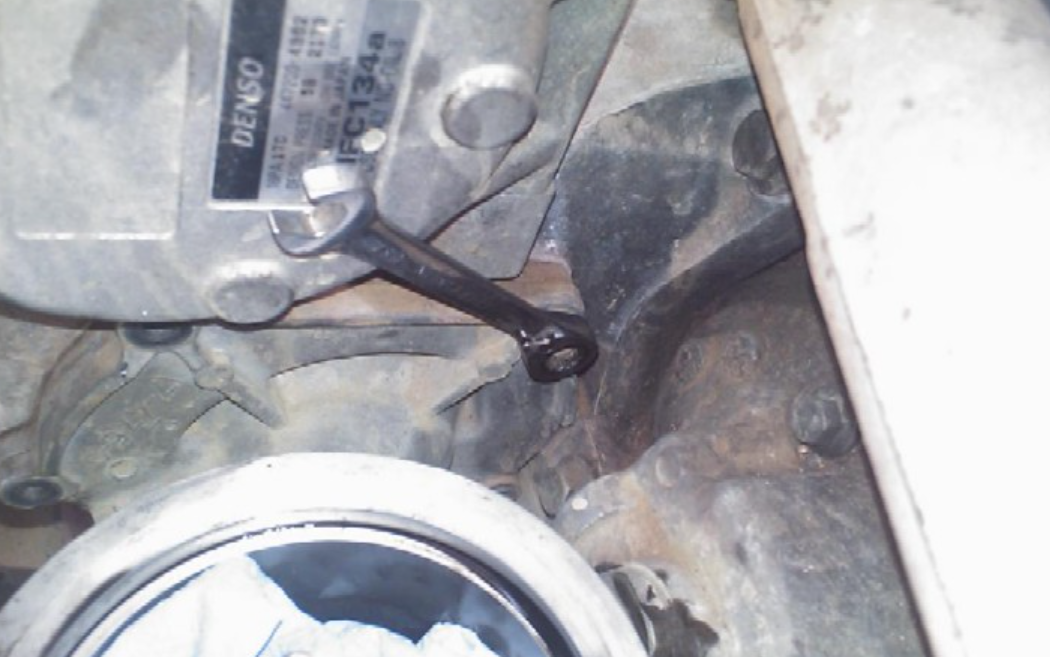
With the housing now able to flex forward, you can access the turbo oil feed hose using a 14mm spanner.

Undo that hose and be CAREFUL not to drop / lose the copper washers, it has one either side of the banjo fitting.. you will probably find once its "cracked" you can wind it by finger pressure only.....the washer may well be stuck to the housing, but keep an eye on it...
Turbo oil feed hose banjo removed (above), one washer stuck under the head still and the other from the housing side.. Once removed, then flex the hose up and clear of the rotor housing..

In the picture above, you can also see a "peg" or step on the casting just next to where the feed hose goes, the rotor filter housing will now "flex" down and rearwards "Under" the peg, not much but it's enough to continue with the water pump removal.
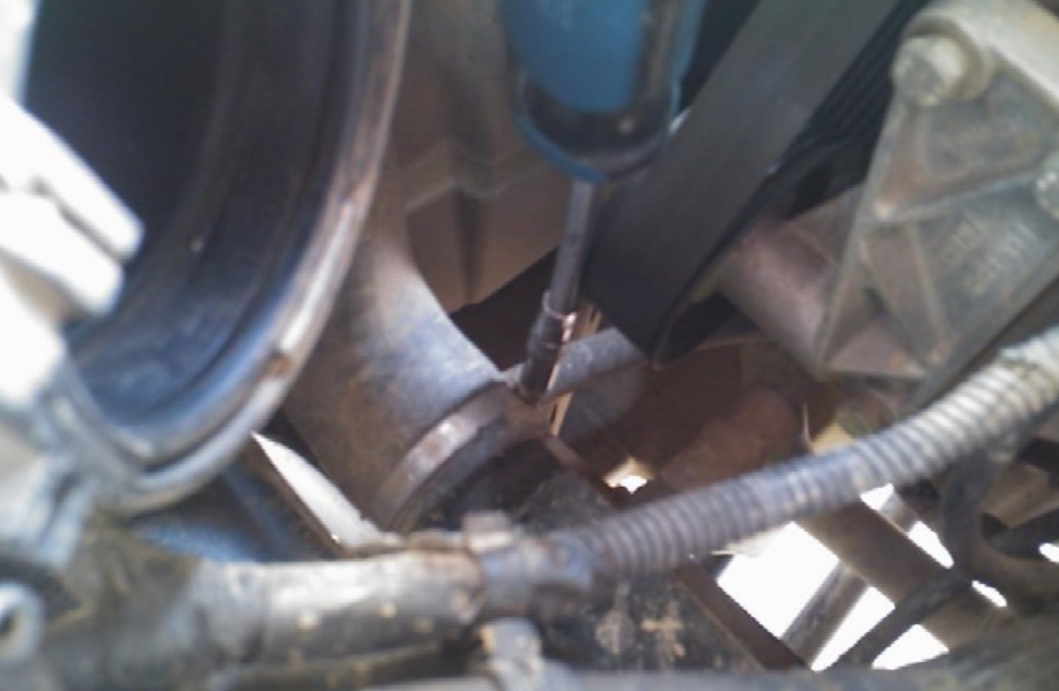
Now before we actually loosen the pump, we need to drain the cooling system, to do that there is a handy drain plug fitted into the lower coolant rail. To get to that you will need to remove (if its fitted) the small plastic trim that covers it just above the steering damper.
With that panel removed, you will see the coolant drain plug......these are often very tight and may even be already rounded off by a previous attempt to remove it. If it is still in good shape, again use a six point socket and extension to "crack" it off

If your drain plug is to tight, or already damaged you will have to drain the coolant by removing a lower radiator hose. This then will make it more difficult to keep the coolant clean and collect it for re-use as it will run all over the dirty chassis etc. If this is what you need to do I would then strongly advise you collect it as best you can, but dispose of it properly and renew the coolant upon completion of the pump replacement..
If you plug however does come out, then it is possible to feed an good sized funnel up onto the steering damper / drag link and if you funnel has a handle it will sit / hang below the plug quite nicely. You can then remove the plug and drain the water directly into a clean container, a washing up bowl is plenty good enough in size to catch the amount you will drain..

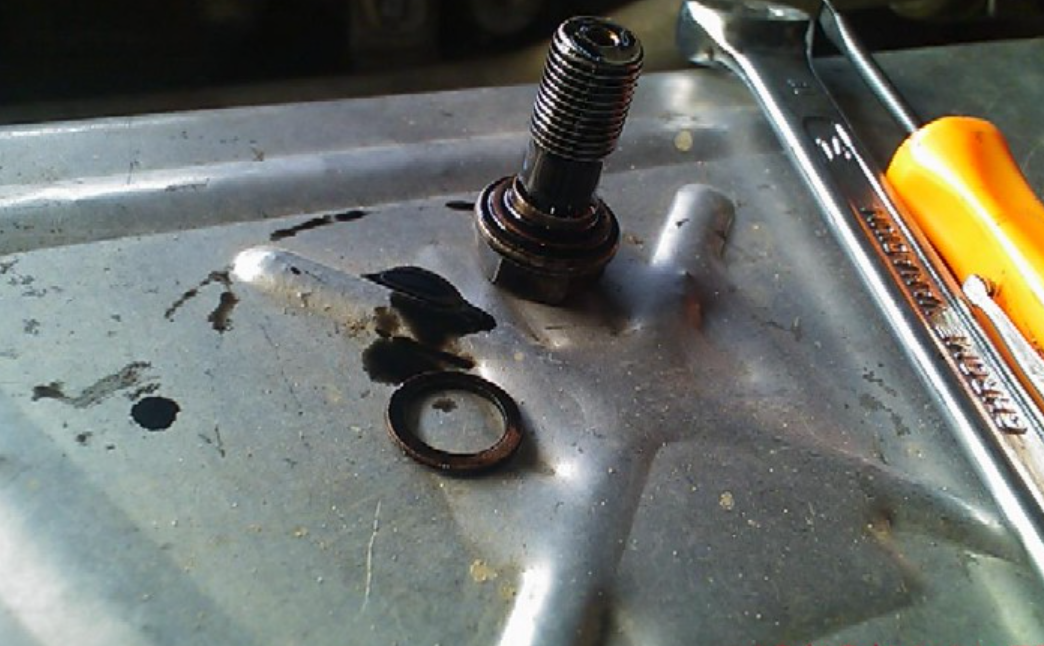
NOTE :- the drain plug does have a washer / seal, it may stay either stuck to the rail or come with the plug, just be aware.......Also, the coolant will not flow freely once you removed the plug as it has to take air in to allow it to flow.....so making sure you funnel is secure, go to the expansion tank and SLOWLY crack the cap off, you will be able to then see / hear and control the flow into the bowl....draining the coolant in this way will make no mess and enable its re-use.
Right, once the flow has slowed enough, remove the cap from the expansion tank and leave your bowl and funnel in position to catch any more coolant that drips when you "break" into the water pump side of the system. It is not possible to catch all teh coolant that will come out when you remove the pump, so place another container below the coolant pump, a large drip tray works well.....
Right we can now attack the pump itself, first off remove the hose directly onto the pump cover...

This will allow more coolant to drain from both the drain plug and from this hose...
Now its time for the pump cover itself......it is held on by 5 x 8mm headed bolts.

4 of the bolts are circled above, the 5th bolt is just under where the hose connects to the cover...Now this is where tooling is important, THE most handy tool for this job is a 8mm ratcheting spanner
If you don't have one of these, then either get one, or remove the rotor filter housing completely to allow access with other tools...
This spanner will allow easy access to remove all the bolts....the bolt closest to the engine block is the most difficult to access, but the spanner can be fed up from underneath to access it if you cannot get on from the top..
I have quite skinny hands so access from the top and bottom is possible for me, you may find one way is easier than another, but I cannot stress enough how much easier it is with this type of spanner.. Once all the bolts are removed, you can then remove the pump cover
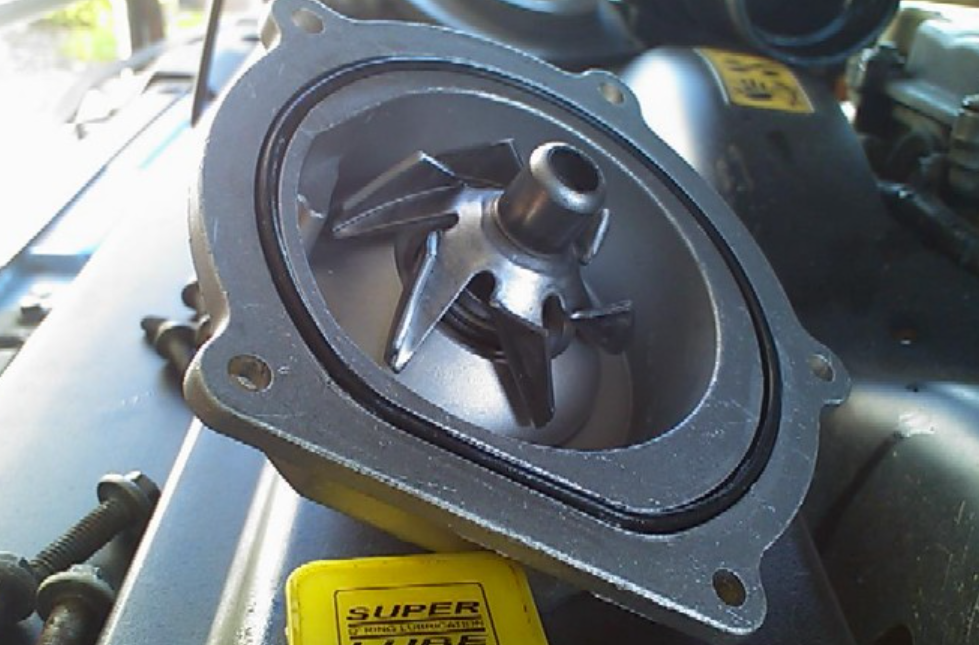
This reveals the water pump.

The cover retains the pump as well, so the pump is now free to be removed, be patient with it and take NOTE of which way you remove it as will assist you in feeding the new one back in again

You can see how tight space is from the above picture, flexing the rotor housing forward and down and rotating the pump a bit will allow it to come out. BE CAREFUL to not jam it and damage the face of where it sits on the accessory casting. It will be the drive wheel that interferes the most, but take your time and manipulate it out.

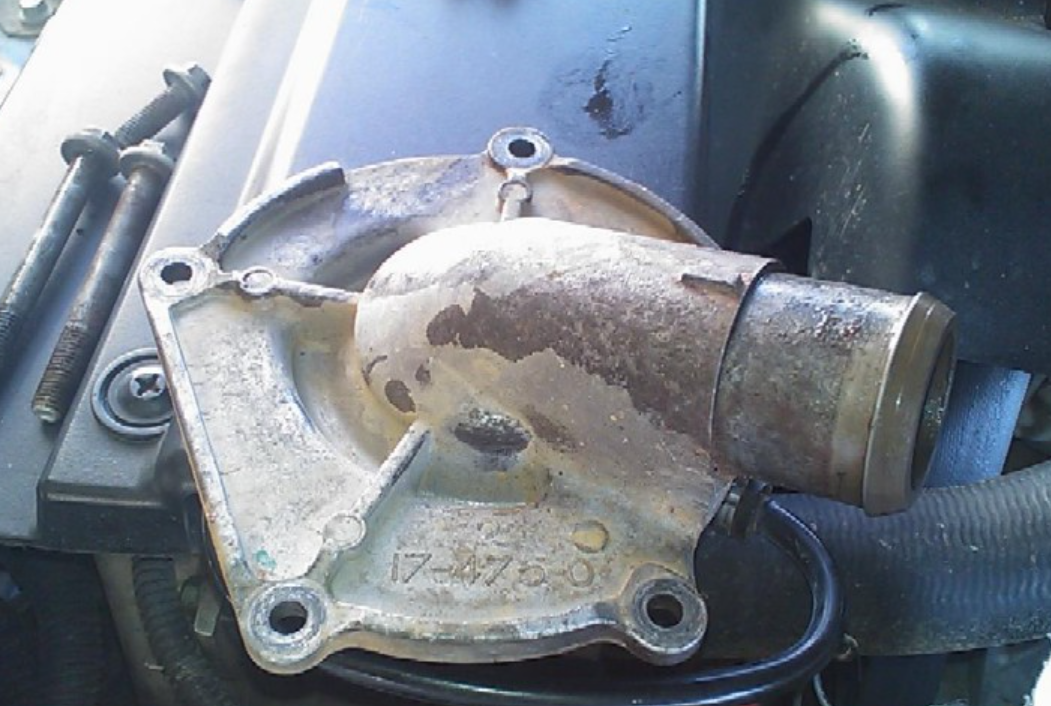
Old pump above, the "weep" hole in the pump shows evidence of coolant leakage...the holes line up with the holes / drillings in the accessory casting seen in the picture below..
You can also see the power steering pump drive wheel that "keys" into the water pump to drive it.
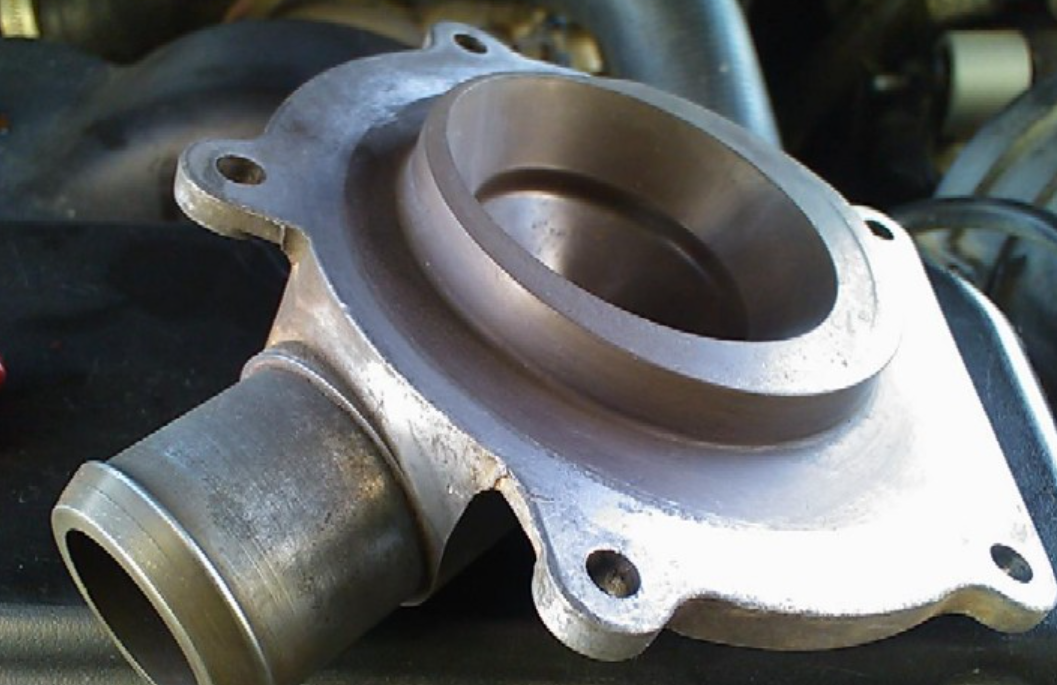
Now its time to put the new one in, but before so give the 2 machined faces above in the accessory casting a good clean with scotchbrite or fine wet and dry as they are the "sealing" faces of the water pump. TAKE CARE to not leave any bits of rag or paper in there whilst doing it, and also be careful as some of the un-machined edges of the casting are quite sharp.
Also clean up the water pump cover inner face and especially the hose outlet of any build up of lime scale / corrosion as it will cause the hose to leak..
Cover mating face and hose outlet cleaned up......To refit the new pump, I use some "o" ring grease and give all 3 seals a light smearing to assist it when fitting the pump to the casting and the outlet cover to the new pump
The seals are "bonded" to the new pump, I have seen "Pattern" parts where the seals have already started to come away from the pump assy, so it would pay you to buy a good quality OEM or even Genuine pump. I used a Quinton Hazel pump which is the same as Land Rover used.
When fitting the new pump, again manipulate it gently into the housing (hope you remembered how you go it out!! ), the pump has a unique shape so make sure its orientated correctly for the 5 bolt holes to line up......You must also make sure the drive key on the pump lines up correctly with the one on the back of the power steering pump, the water pump will not sit correctly if the drive keys are not aligned, you will also be able to rotate the pump impeller as well to aid your fitting, take your time it can be fiddly!!..
NOTE :- the new pump will not push directly straight back into the casting as the edge of the pump body will catch on the bolt arrowed below..

This is where careful manipulation of the pump will help get it re-fitted correctly......once in refit Fit and Start ALL bolts by hand on the cover and tighten the bolts to 9 NM or 7Lbsft .
Using a magnet on an extending stick will help place the bolts into the holes on both the water pump cover and the rotor filter housing. Refit the turbo oil feed pipe banjo taking care not to drop the copper sealing washers....
Continue to refit all the other items removed including the :-
The rotor filter housing bolts need to be done up to..25 NM or 18Lbsft.
engine oil filters x 2
Intercooler hose (metal) and associated waste gate tubing,
Intake hose and MAF sensor / loom.
Engine acoustic cover.........AND
Most importantly the coolant rail drain plug!!!!!!!!
Refit the lower plastic under body trim....
Now continue to refill the coolant tank with either the collected coolant or new stuff, it will drain down after a few minutes, continue to fill until it settles at the full mark. Then refit the cap and unclip the coolant tank from its mountings, you can manipulate it of its home carefully.
Next remove the bleed screw from the top radiator hose.. raise the coolant tanks as high as it will go and continue then to refill the expansion tank until coolant flows from the bleed screw in the top hose.....Refit the bleed screw DO NOT OVER TIGHTEN it is only plastic.....
Refit the coolant tank, start the car and check for any obvious leaks. If all is good, ensure all tooling etc is removed from under the bonnet and take the vehicle for a drive to get it up to temperature (temp gauge central) Ensure the heater is also set to high.
Either during or upon return from your test drive, check again for any leaks. Once the vehicle has cooled COMPLETELY i.e. overnight, then before using it check and top up the coolant again as required.